
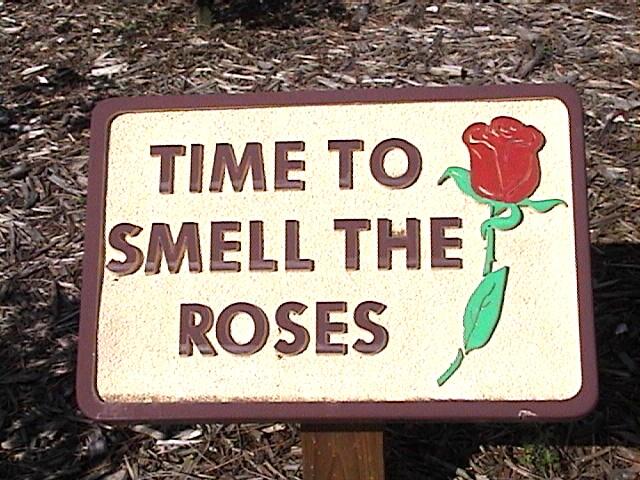
Course and Scorecards
Bobcat Course Tour
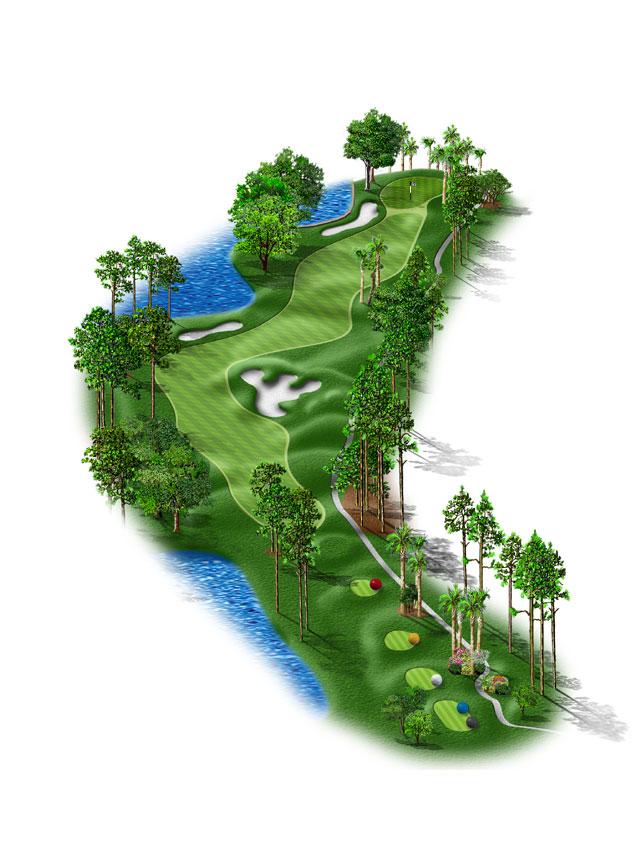
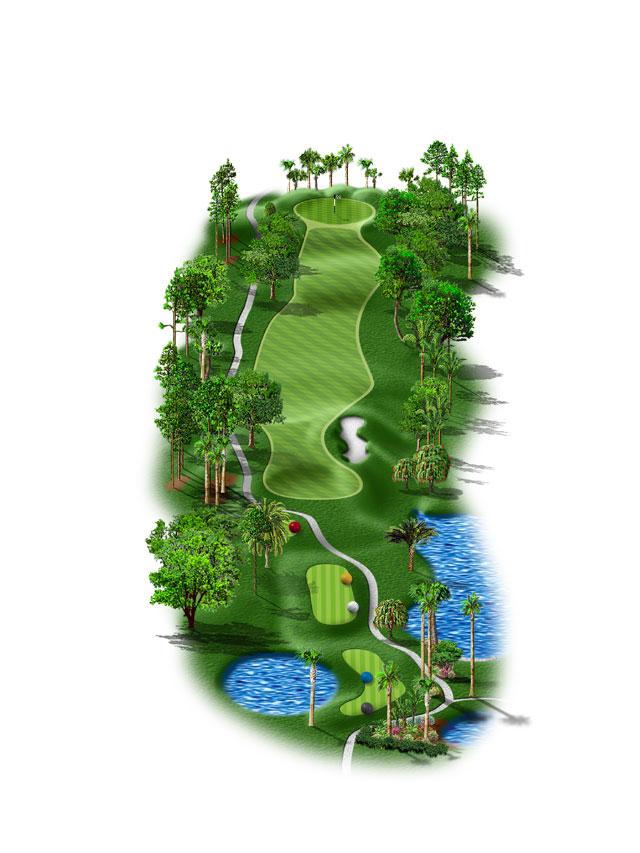
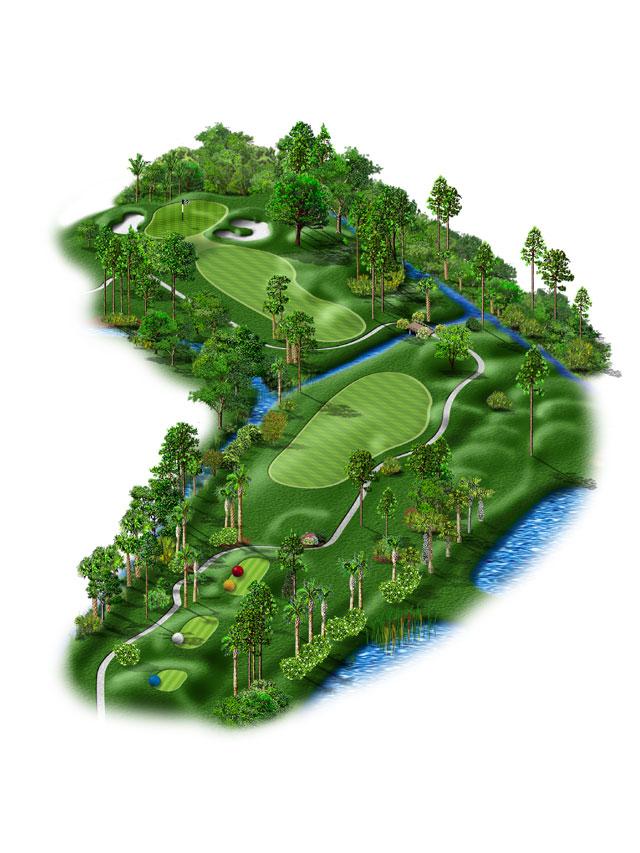
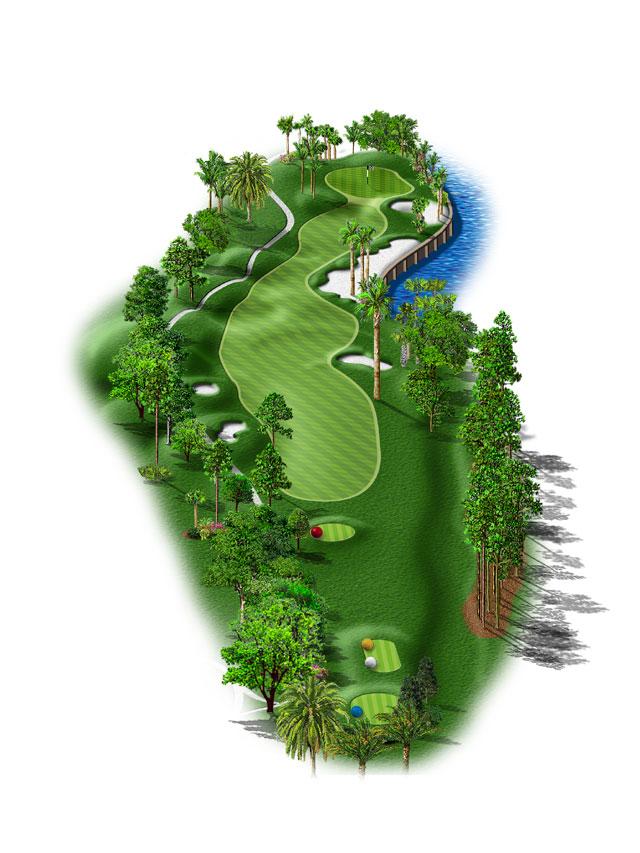
Hole 1
| Tee | Par | Yardage | Handicap |
|---|---|---|---|
 Black Black
|
4 | 393 | 11 |
 Gold - Ladies Gold - Ladies
|
4 | 327 | 7 |
 Red Red
|
4 | 320 | 7 |
| Tee | Par | Yardage | Rating |
|---|---|---|---|
 Blue Blue
|
4 | 369 | 11 |
 White White
|
4 | 352 | 11 |
| Tee | Par | Yardage | Rating |
|---|---|---|---|
|
Gold - Men
|
4 | 327 | 11 |
Hole Description
The opening hole of the Bobcat course offers a typical Ron Garl start for all players. A straight away par 4 that has an elevated fairway blocking the view of the green's complex from the tee. While the width of the fairway is forgiving, an off-line tee shot may find one of three large fairway bunkers. Approach shots land on a large green that slopes from the back to the front and also bunker protected.
How To Play
The average to good player can step on their tee shot at this opening hole. There is plenty of room in the landing area, but to score on this hole you need your first shot to carry to the top of the hill. Your approach shot to the green needs to finish below the hole. Downhill putts will be treacherous. Staying below the hole may offer an occassional birdie.
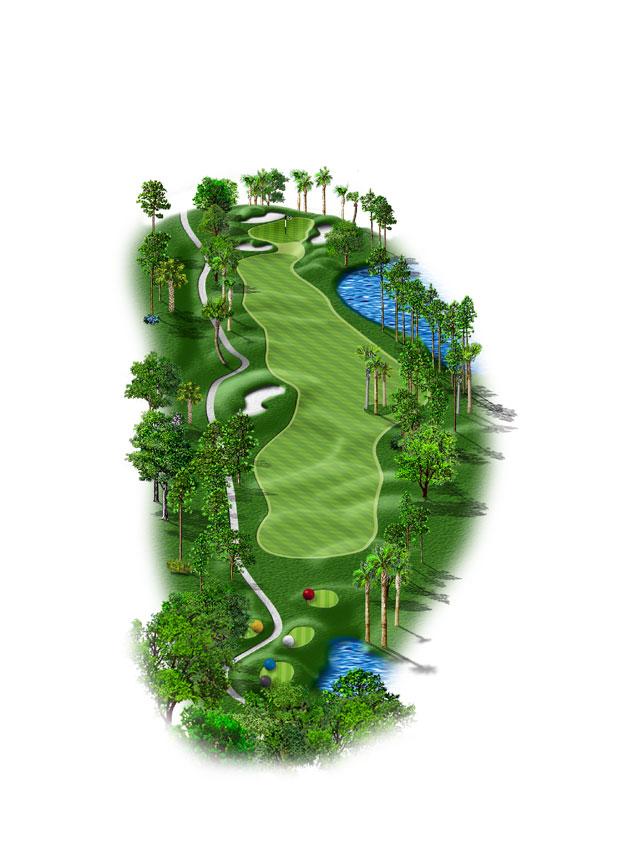
Hole 2
| Tee | Par | Yardage | Handicap |
|---|---|---|---|
|
Black
|
4 | 418 | 3 |
|
Gold - Ladies
|
4 | 354 | 5 |
|
Red
|
4 | 324 | 5 |
| Tee | Par | Yardage | Rating |
|---|---|---|---|
|
Blue
|
4 | 392 | 3 |
|
White
|
4 | 375 | 3 |
| Tee | Par | Yardage | Rating |
|---|---|---|---|
|
Gold - Men
|
4 | 354 | 3 |
Hole Description
A favorite hole for many, this long par 4 really unveils itself as the player approaches the tee shot landing area. Doglegging left around a multi-terraced fairway you are faced then with an angled green protected by a lake on the right with a greenside stone retaining wall. This hole is featured on our scorecard cover.
How To Play
After the 2001 design changes players may consider driving the tee shot over the left side of the big hill in hopes of avoiding too heavy rough. If successful, a shorter iron will aid the approach shot. Higher handicappers need to play three shots safely around the water and all should keep their approach shots below this hole.
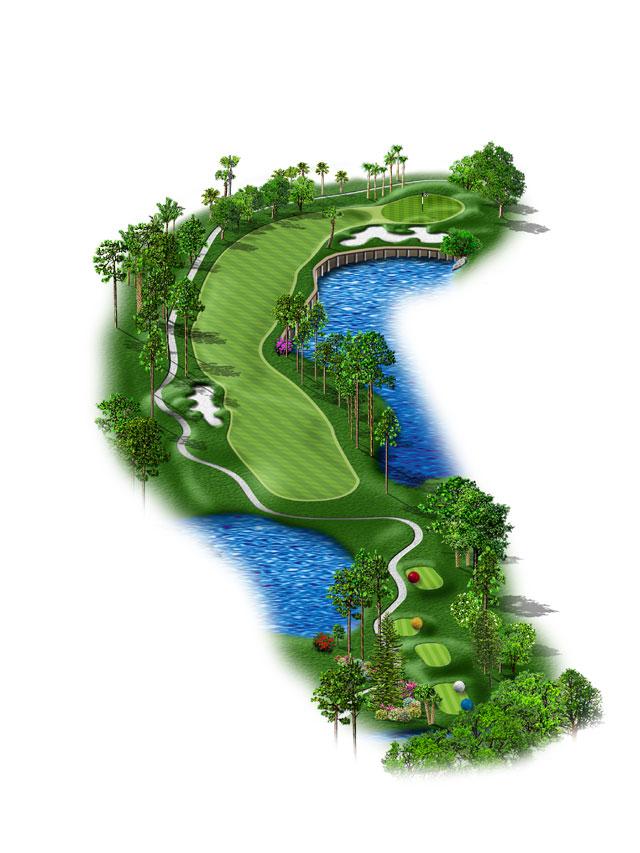
Hole 3: The Road Hole
| Tee | Par | Yardage | Handicap |
|---|---|---|---|
|
Black
|
3 | 184 | 17 |
|
Gold - Ladies
|
3 | 128 | 17 |
|
Red
|
3 | 101 | 17 |
| Tee | Par | Yardage | Rating |
|---|---|---|---|
|
Blue
|
3 | 167 | 17 |
|
White
|
3 | 144 | 17 |
| Tee | Par | Yardage | Rating |
|---|---|---|---|
|
Gold - Men
|
3 | 128 | 17 |
Hole Description
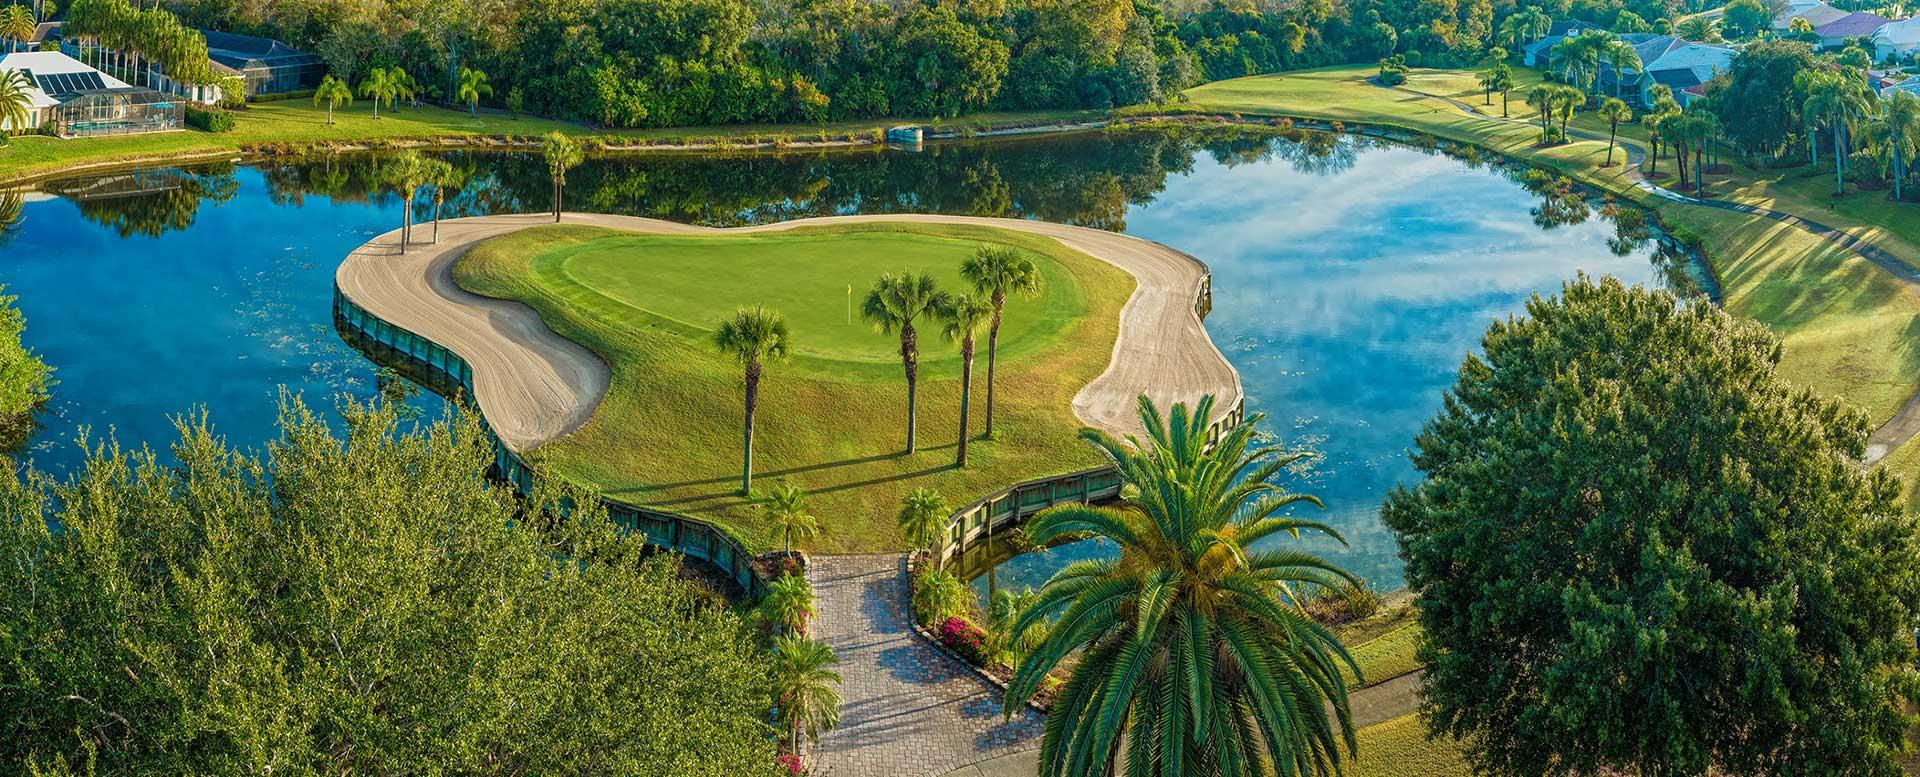
Located at the corner of Plantation's main entrance, this pretty par 3 hole is well protected by right and back side bunkering along with another stone retaining wall nearly up to the edge of the green holding a lake off its left side.
How To Play
The tight lake on the left of this green claims many a golf ball. Protect left and miss short if needed. It is no bargain to play from the deep bunker on the right knowing that the lake lurkes just off the far collar of the green. Again, a very good hole to stay below the cup.
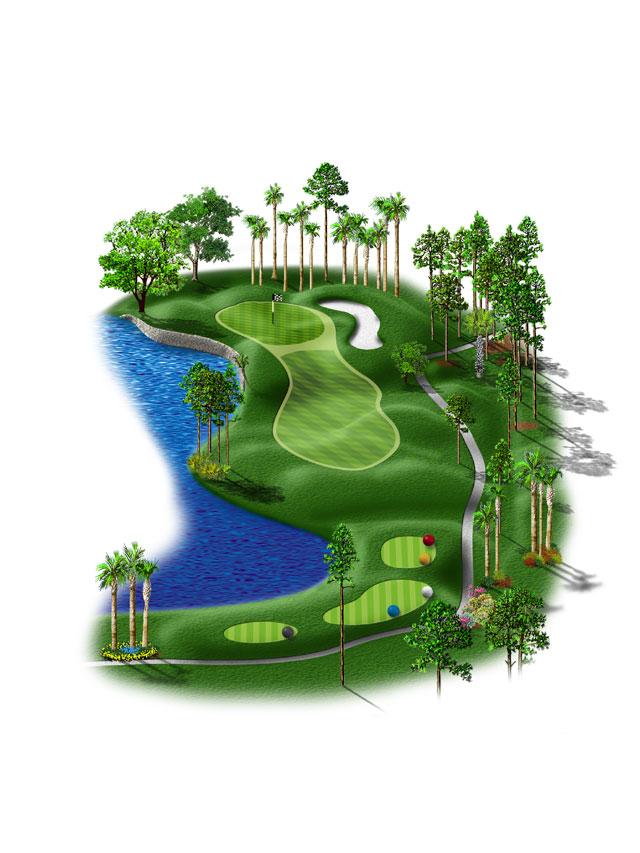
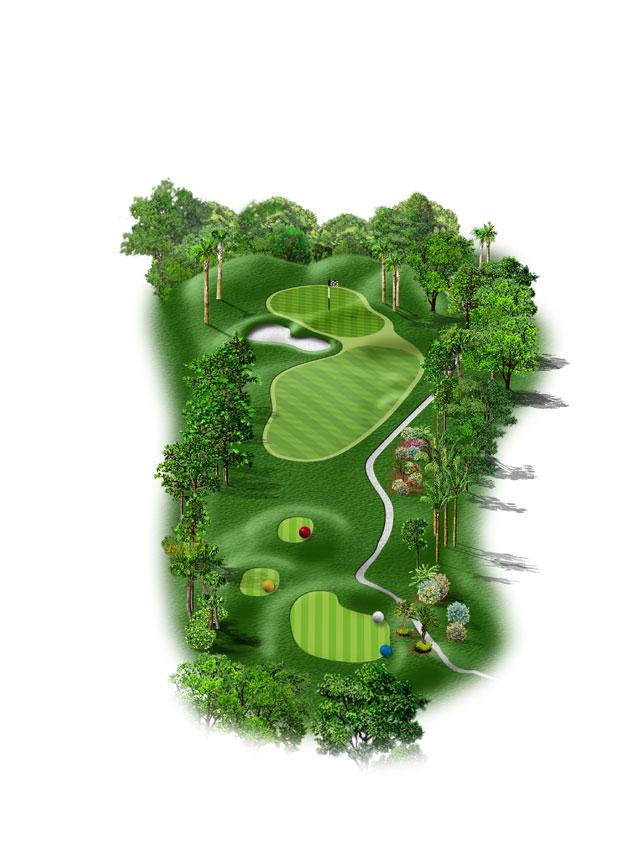
Hole 4: The Hill
| Tee | Par | Yardage | Handicap |
|---|---|---|---|
|
Black
|
5 | 528 | 9 |
|
Gold - Ladies
|
5 | 445 | 3 |
|
Red
|
5 | 425 | 3 |
| Tee | Par | Yardage | Rating |
|---|---|---|---|
|
Blue
|
5 | 504 | 9 |
|
White
|
5 | 477 | 9 |
| Tee | Par | Yardage | Rating |
|---|---|---|---|
|
Gold - Men
|
5 | 445 | 9 |
Hole Description
The first par five on the front side of the Bobcat, this hole plays longer than its total yards. In some circles the landing area of this hole is considered the highest elevation point in southwest Florida. A mountain of earth was moved here to create an uphill tee shot followed by a beautiful view down to the second landing area and the nearly island green.
How To Play
Only the true long ball hitters dare go for this green in two. For nearly everyone else, this is a three or four shots to the green hole. Players must not miss this tee shot to the right or it is down the hill and wet. The most important shot is your second. There is enough forgiveness down the fairway from left to right, but your distance is critical. Play to the 100 yard marker if you can, and get a short club out to the green. Smart distance calculations can lead to birdies here at #4.
Hole 5: Big Foot
| Tee | Par | Yardage | Handicap |
|---|---|---|---|
|
Black
|
4 | 430 | 1 |
|
Gold - Ladies
|
4 | 365 | 1 |
|
Red
|
4 | 329 | 1 |
| Tee | Par | Yardage | Rating |
|---|---|---|---|
|
Blue
|
4 | 417 | 1 |
|
White
|
4 | 392 | 1 |
| Tee | Par | Yardage | Rating |
|---|---|---|---|
|
Gold - Men
|
4 | 365 | 1 |
Hole Description
This #1 handicap hole for the men has certainly earned that ranking over the years. This par 4, dogleg right hole measures nearly 400 yards from the regular men's tees. Two new bunkers were added during the recent bunker renovation project; a small catch bunker at the end of the fairway and a new greenside bunker to the front left of the putting surface. A new wood retaining wall beautifully frames the entire left side of the putting green complex. The redesigned main attraction on this hole though is a huge fairway bunker in the shape of a "big foot".
How To Play
A par will be most difficult for those who find their tee shot within the confines of our "Big Foot" bunker. This hole can bring anyone a huge number if you play it risky. A reasonable tee shot somewhere in the short grass must be followed by a conservative second shot safely avoiding the perils of the left side. #5 also presents one of the more steeply sloped putting surfaces from back to front. Missing this green short into the approach might just be your ticket to a short chip from below the hole, one uphill putt and a very sneaky par.
Hole 6
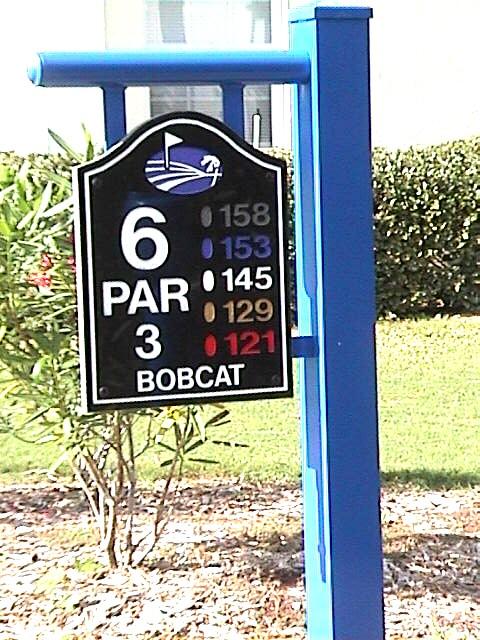
| Tee | Par | Yardage | Handicap |
|---|---|---|---|
|
Black
|
3 | 158 | 15 |
|
Gold - Ladies
|
3 | 129 | 15 |
|
Red
|
3 | 121 | 15 |
| Tee | Par | Yardage | Rating |
|---|---|---|---|
|
Blue
|
3 | 153 | 15 |
|
White
|
3 | 145 | 15 |
| Tee | Par | Yardage | Rating |
|---|---|---|---|
|
Gold - Men
|
3 | 129 | 15 |
Hole Description
This is one of Plantation's prettiest par 3 holes. A variety of yardages are available over some nice and expansive teeing grounds from the most forward red tees of 117 yards to a 154 yard shot from the back, black tees (all carry over water). The 6th is protected on the left by another large stone, lake bank wall and a bunker right. There is a great view across the small lake to the 5th green as well.
How To Play
This is the last par 3 on the front side. If the lake bank wall intimidates you, this will be a tough hole. The yardages are not long here and most should ease onto this green. Here, direction is critical. A miss left or right will bring a big number into the picture. This green also offers a subtle but major break from the bunker toward the lake and front. A good lag putter can survive this with a par.
Hole 7
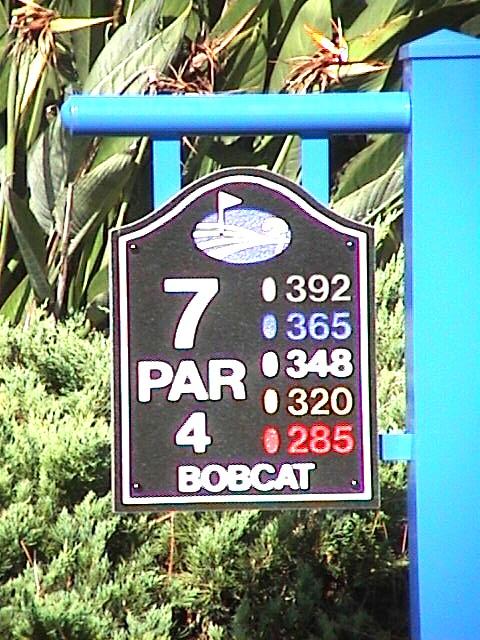
| Tee | Par | Yardage | Handicap |
|---|---|---|---|
|
Black
|
4 | 392 | 5 |
|
Gold - Ladies
|
4 | 320 | 13 |
|
Red
|
4 | 285 | 13 |
| Tee | Par | Yardage | Rating |
|---|---|---|---|
|
Blue
|
4 | 365 | 5 |
|
White
|
4 | 348 | 5 |
| Tee | Par | Yardage | Rating |
|---|---|---|---|
|
Gold - Men
|
4 | 320 | 5 |
Hole Description
The Bobcat's 7th offering around the front provides an opportunity to relax and catch your breath. This medium length par 4 doglegs left between two fairway bunkers and then up to a very comfortable and nice sized green. One greenside bunker flanks the left side of the putting surface.
How To Play
You can relax and play a couple of straight shots down the middle of this hole and wind up on one of the less undulating greens at Plantation. Or, you can grip it and rip it down the left side and go for the short iron dart to the pin in hopes of a birdie opportunity. Nothing fancy happening here. Some good and comfortable mechanics and you can swing to some success here.
Hole 8

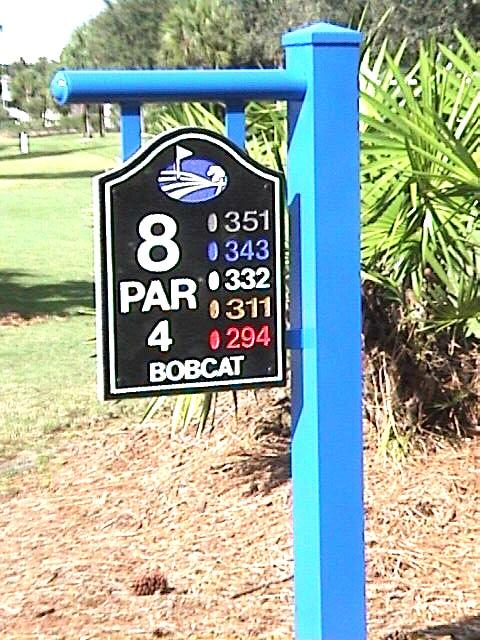
| Tee | Par | Yardage | Handicap |
|---|---|---|---|
|
Black
|
4 | 351 | 13 |
|
Gold - Ladies
|
4 | 311 | 13 |
|
Red
|
4 | 294 | 11 |
| Tee | Par | Yardage | Rating |
|---|---|---|---|
|
Blue
|
4 | 343 | 13 |
|
White
|
4 | 332 | 13 |
| Tee | Par | Yardage | Rating |
|---|---|---|---|
|
Gold - Men
|
4 | 311 | 13 |
Hole Description
From the new teeing areas to the approach at this green, a complete redesign is being enjoyed. A short dogleg left around a threatening new bunker starts our players thinking about what shot to hit from this tee. #8 now has a wider, meandering fairway that is peaked on the right by some extensive mounding before the water's edge. We now have a much better view into the uniquely contoured green and back drop trees.
How To Play
The big decision at this hole is what to select from the tee. For most players a drive will be too much or at least more than needed. The redesign was laid out to persuade players to play out to the right side of the fairway. Cutting the dogleg at all brings into the equation both the short bunker left and then the longer bunker to the right. The risk/reward factor is important because the 8th green is all about position. It may be worth the risk from the tee to have a shorter shot into the best spot relating to that day's pin location.
Hole 9
| Tee | Par | Yardage | Handicap |
|---|---|---|---|
|
Black
|
5 | 538 | 7 |
|
Gold - Ladies
|
5 | 460 | 9 |
|
Red
|
5 | 424 | 9 |
| Tee | Par | Yardage | Rating |
|---|---|---|---|
|
Blue
|
5 | 515 | 7 |
|
White
|
5 | 487 | 7 |
| Tee | Par | Yardage | Rating |
|---|---|---|---|
|
Gold - Men
|
5 | 460 | 7 |
Hole Description
The 9th is a par 5 slowly sweeping dogleg right. It can play over 530 yards and is framed along its entire right side by water with very little buffer between fairway and lake bank. This hole is a great front nine finishing hole with a beautiful view of the clubhouse and grounds revealed as you progress down the fairway.
How To Play
A classic par 5 finishing hole is #9. Each shot along the way lends itself to a left to right feel, yet water looms for the hint of any slice. Many play through the rough up the left side to avoid any watery grave. Like #4, your second shot is the make or break shot. Do not try to squeeze into the narrowest of landing areas beyond the 100 yard marker. Even though the green is small, it is accessible and all putting breaks are smooth and even toward the front. Play smart with your fairway club and you'll be smiling at the Halfway House.
Hole 10
| Tee | Par | Yardage | Handicap |
|---|---|---|---|
|
Black
|
4 | 435 | 14 |
|
Gold - Ladies
|
4 | 339 | 14 |
|
Red
|
4 | 304 | 14 |
| Tee | Par | Yardage | Rating |
|---|---|---|---|
|
Blue
|
4 | 420 | 14 |
|
White
|
4 | 362 | 14 |
| Tee | Par | Yardage | Rating |
|---|---|---|---|
|
Gold - Men
|
4 | 339 | 14 |
Hole Description
The first hole of the back nine is a straight away, long par 4. A large bunker protects the right side of the tee shot landing area. This hole rolls over two hills until reaching a large green with no bunkering and a shadowing berm across the back side. The 10th traditionally plays as one of the most difficult for the LPGA Qualifier each year.
How To Play
Out of bounds begins down the left side about 200 yards from the white tees. The fairway bunker can be forbidding on the right but, this should be a "grip it and rip it" tee shot for most. Players who can carry the first hill will have a much lesser club to approach the green. This should also be a middle of the green target, regardless of the hole location. With little undulation, take dead aim with the putter and you may earn a shot in the bank before coming to a tough string of holes ahead.
Hole 11
| Tee | Par | Yardage | Handicap |
|---|---|---|---|
|
Black
|
4 | 401 | 6 |
|
Gold - Ladies
|
4 | 357 | 6 |
|
Red
|
4 | 336 | 6 |
| Tee | Par | Yardage | Rating |
|---|---|---|---|
|
Blue
|
4 | 387 | 6 |
|
White
|
4 | 367 | 6 |
| Tee | Par | Yardage | Rating |
|---|---|---|---|
|
Gold - Men
|
4 | 357 | 6 |
Hole Description
#11 is a really pretty par 4 hole. It is connected along its right side by the 17th hole and provides a nice panoramic view as players make their way down this hole. A treacherous bunker flanks the left hand landing area and the green is surrounded by three more bunkers.
How To Play
The approach shot to the 11th is the most important shot for all players. As long as one has avoided the fairway bunker, then position to the flagstick determines your final score. For higher handicap players, a second shot short of the green that gives you a good angle to chip up to the hole is preferred. Better players simply need to stay below the hole. One of the hardest putts to make at 11 is from the left side to a front pin.
Hole 12
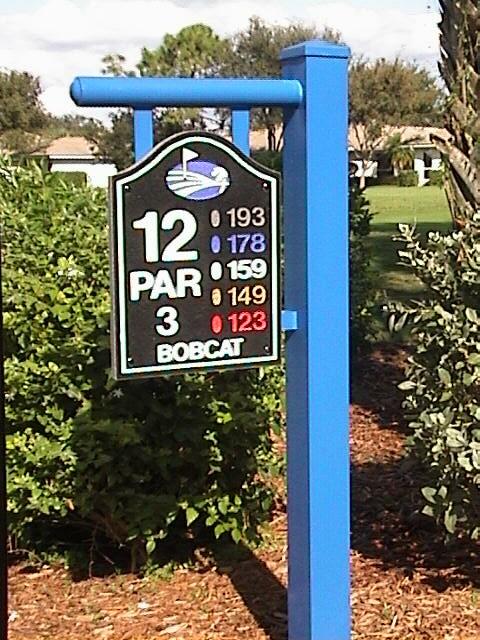
| Tee | Par | Yardage | Handicap |
|---|---|---|---|
|
Black
|
3 | 193 | 12 |
|
Gold - Ladies
|
3 | 149 | 18 |
|
Red
|
3 | 123 | 18 |
| Tee | Par | Yardage | Rating |
|---|---|---|---|
|
Blue
|
3 | 178 | 12 |
|
White
|
3 | 159 | 12 |
| Tee | Par | Yardage | Rating |
|---|---|---|---|
|
Gold - Men
|
3 | 149 | 12 |
Hole Description
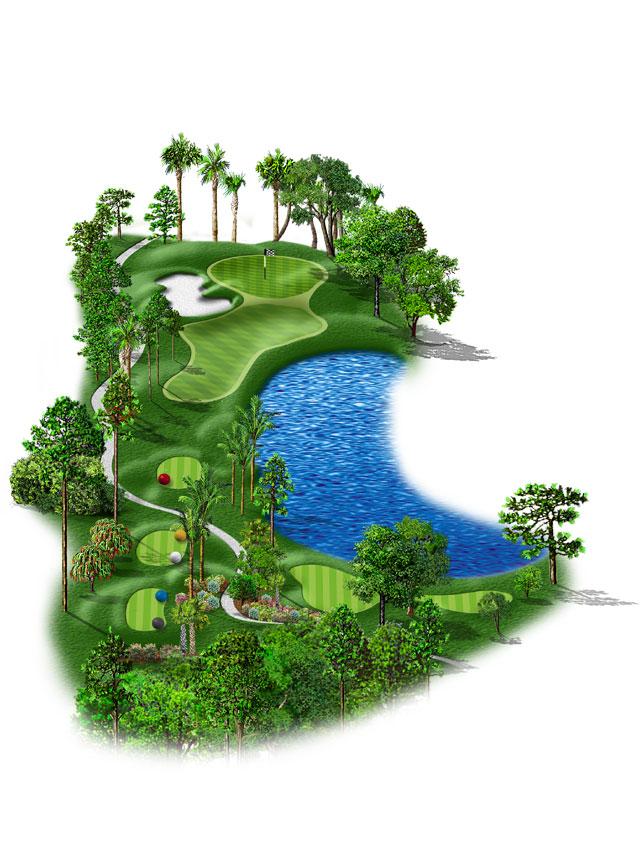
Arguably the most challenging par 3 at Plantation. Recent renovations produced a fabulous new set of men's tees to the right. Clearly that location presents an all-carry look over the 12th's lake. A restored greenside bunker is intimidating to look at from the tee but is flatter than before and easier to exit for some players. With it's high profile putting surface, #12 is trying hard to be king of the par 3s.
How To Play
Depending on what tee location you play from, this hole may require your longest par 3 shot on the day. Most members miss this green short and can come away salvaging a reasonable number by sneaking up on the hole from that position. Those who should carry the tee shot to the green must avoid the big mistake to the right. There is OB over there and some very thick grass that almost guarantees a bogey.
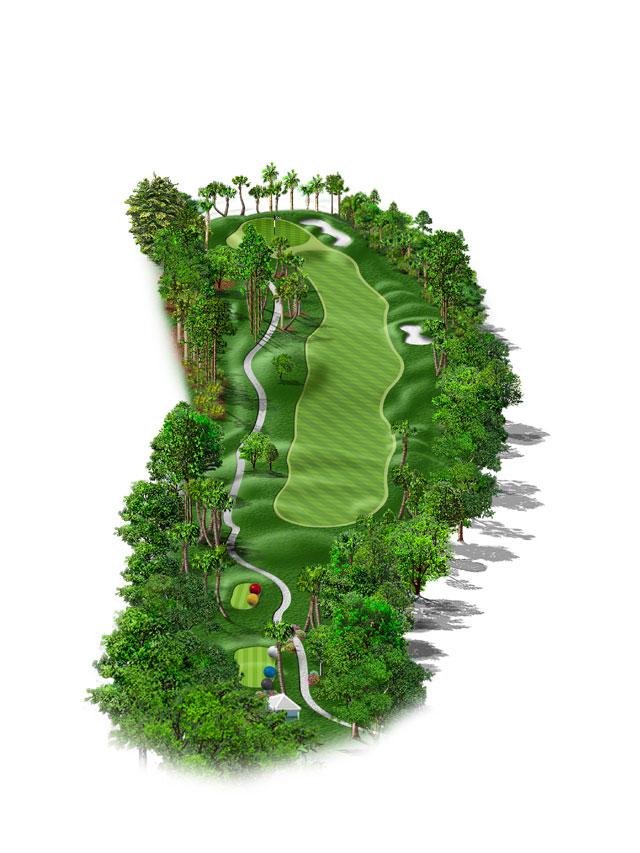
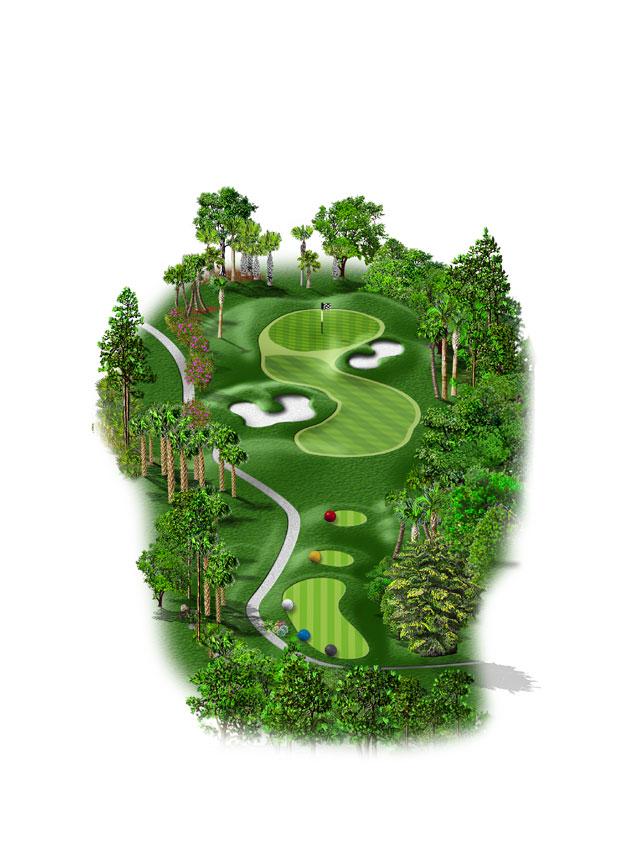
Hole 13
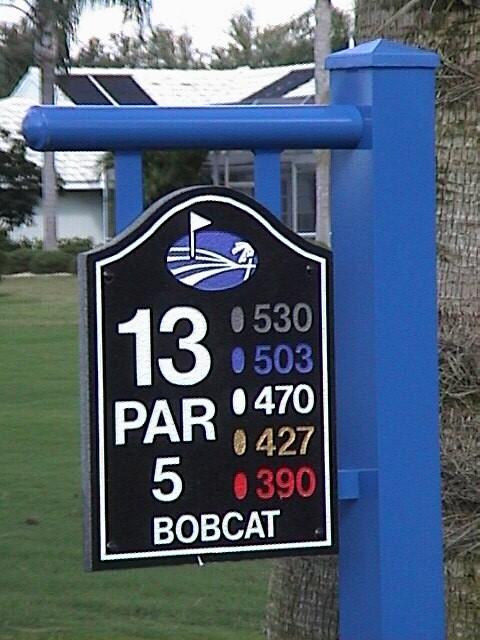
| Tee | Par | Yardage | Handicap |
|---|---|---|---|
|
Black
|
5 | 530 | 4 |
|
Gold - Ladies
|
5 | 427 | 12 |
|
Red
|
5 | 390 | 12 |
| Tee | Par | Yardage | Rating |
|---|---|---|---|
|
Blue
|
5 | 503 | 4 |
|
White
|
5 | 470 | 4 |
| Tee | Par | Yardage | Rating |
|---|---|---|---|
|
Gold - Men
|
5 | 427 | 4 |
Hole Description
A most interesting golf adventure is #13 Bobcat. This hole tempts, teases and sometimes tortures those who misplay this double dogleg. 13 is not a sharp doglegging hole, but rather one that meanders back and forth between its fairway bunkers and the two lakes on either side. The wooded back drop to the green and the second landing area make this another very pretty hole despite it's testy character.
How To Play
For nearly all of the men, this is three shots to the green. Yet, most mistakes are made by those who think the farther each of the first two shots goes, the better. This is not so. Swing too hard from the tee and your margin of error increases to the water on the left or right. Try to hit it too far up into the second landing area and a miss left is wet or in the trees to the right. Venturi would say this is either a 4 or a 7 on the card. Play conservative and an easy up and down puts a 5 on your card.
Hole 14

| Tee | Par | Yardage | Handicap |
|---|---|---|---|
|
Black
|
4 | 360 | 8 |
|
Gold - Ladies
|
4 | 318 | 10 |
|
Red
|
4 | 310 | 10 |
| Tee | Par | Yardage | Rating |
|---|---|---|---|
|
Blue
|
4 | 354 | 8 |
|
White
|
4 | 340 | 8 |
| Tee | Par | Yardage | Rating |
|---|---|---|---|
|
Gold - Men
|
4 | 318 | 8 |
Hole Description
The 14th holes of both courses are so similar. On the Bobcat this hole curves gradually to the left through a tall stand of slash pines. Rolling berms down the right edge of the woods is broken only by a new, small fairway bunker at the turn. A fairly deep greenside bunker on the righthand side is the only other obstacle.
How To Play
There should not be a great deal of strategy in playing this par 4 hole. The fairway is wide and forgiving in the landing zone and the overall length of this hole is not forbidding. Our green here is narrow across but deep from front to back. You can post a good number here if the shadows of those big pines do not derail you.
Hole 15
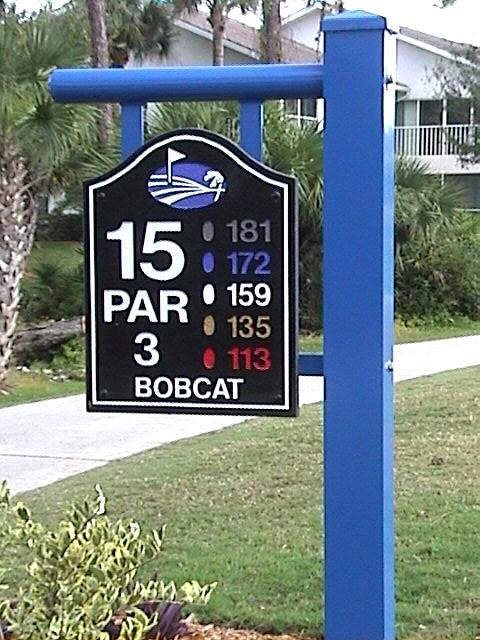
| Tee | Par | Yardage | Handicap |
|---|---|---|---|
|
Black
|
3 | 181 | 16 |
|
Gold - Ladies
|
3 | 135 | 16 |
|
Red
|
3 | 113 | 16 |
| Tee | Par | Yardage | Rating |
|---|---|---|---|
|
Blue
|
3 | 172 | 16 |
|
White
|
3 | 159 | 16 |
| Tee | Par | Yardage | Rating |
|---|---|---|---|
|
Gold - Men
|
4 | 318 | 8 |
Hole Description
There is plenty of visual stimulus for all players as they stand on this par 3 teeing ground. While #15 is not the longest of the par 3s, it is one of the more intimidating to look at. Like the 14th before it, this green is flanked tight on its right side by a sand bunker and very tall trees and wooded area. During the redesign of 2001 the large bunker out in front of this greens complex was rebuilt to appear closer to the landing area. In all, this could be "just another" par 3 if you could play it with your eyes closed.
How To Play
For both our men and women, #15 is the 18th ranked handicap hole. The ladies have 113 yards to the center of the green and the men's white tee offers 159 yards. This green is normally receptive to shots of even moderate loft. If players can get beyond the visual impact of the big bunker in front and the woods to the right, this is not a particularly difficult tee shot. The putting surface, like most at Plantation, slopes from back to front. In the heart of the season the front half of this green can get very quick. Approaching this hole from the bottom up is important. A downhill put to a forward pin at 15 can be treacherous.
Hole 16
| Tee | Par | Yardage | Handicap |
|---|---|---|---|
|
Black
|
5 | 523 | 10 |
|
Gold - Ladies
|
5 | 443 | 8 |
|
Red
|
5 | 427 | 8 |
| Tee | Par | Yardage | Rating |
|---|---|---|---|
|
Blue
|
5 | 508 | 10 |
|
White
|
5 | 495 | 10 |
| Tee | Par | Yardage | Rating |
|---|---|---|---|
|
Gold - Men
|
5 | 443 | 10 |
Hole Description
#16 is a sweeping dogleg left par 5. This hole presents players with gate-like target to the tee shot landing area, with stands of palm trees on either side. In all, five bunkers splash color and obstacles along your path to the green. From the 200 yard marker in, this par 5 sets up beautifully across a small lake to a high profile putting green with a catch bunker front left and the entire back side hugged by another huge bunker and big canary palms that stand as guardians of the 16th.
How To Play
Like many of the Ron Garl designed holes on the Bobcat, there is always an element of risk and reward for the shotmaker. The tee shot must be safely negotiated before you can tackle the two most important shots on this hole. Remember, risk and reward should dictate your strategy. Need a low number near the end of a round? Go for the green in two or hit a longer shot through the corner of the dogleg. Protecting a good score or trying to stop the bleeding? Play it safe with the second and third shots. Don't hit it too hard or too far and you can sneak up on this hole in 3 or 4 shots.
Hole 17

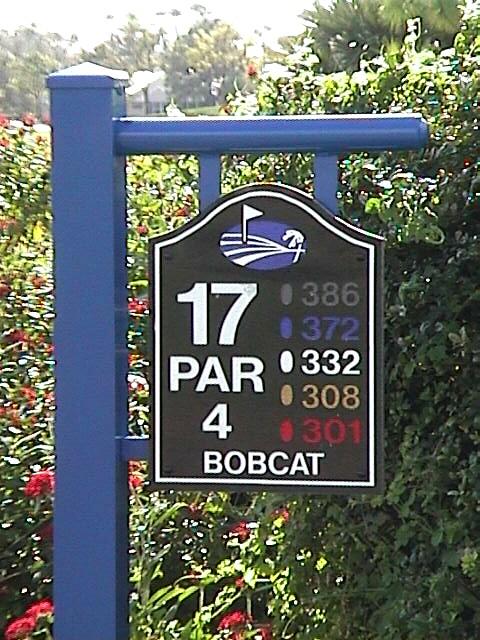
| Tee | Par | Yardage | Handicap |
|---|---|---|---|
|
Black
|
4 | 386 | 18 |
|
Gold - Ladies
|
4 | 308 | 4 |
|
Red
|
4 | 301 | 4 |
| Tee | Par | Yardage | Rating |
|---|---|---|---|
|
Blue
|
4 | 372 | 18 |
|
White
|
4 | 332 | 18 |
| Tee | Par | Yardage | Rating |
|---|---|---|---|
|
Gold - Men
|
4 | 308 | 18 |
Hole Description
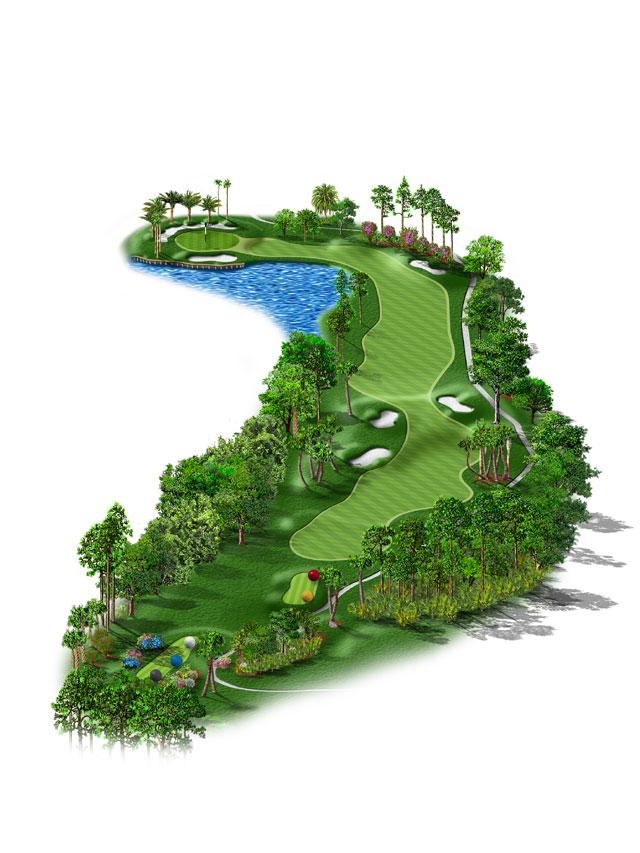
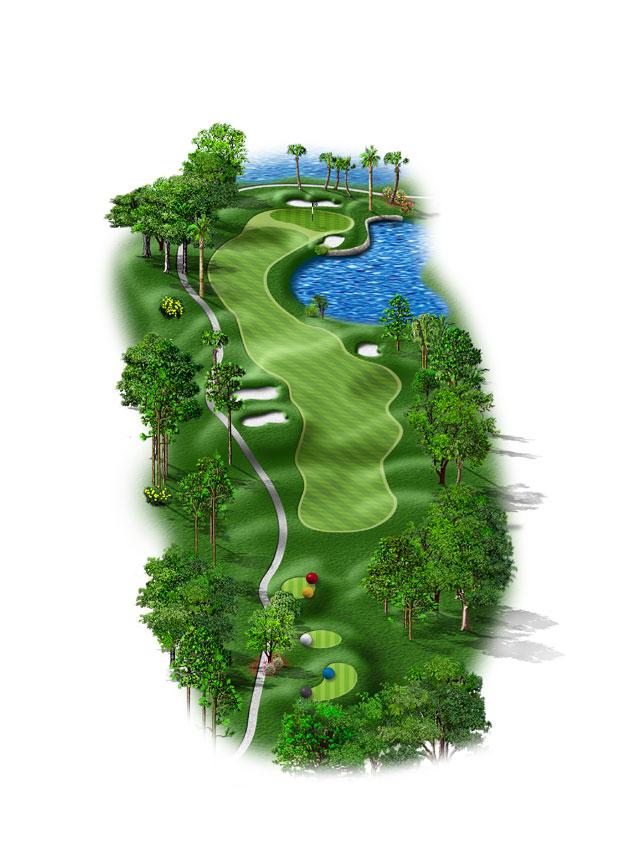
The par 4, 17th hole of the Bobcat is a classic. Many major events have been decided at this impressive and challenging golf hole. As you cross the street from 16 toward the five different teeing grounds to #17 the entire dogleg left fairway and our biggest lake bursts into view. It is indeed quite a sight to stand by the back tees and look across the lake to the green. Three terraced bunkers invite your eye to the right half of the green and two tear-drop fairway bunkers frame the opposite side of the fairway.
How To Play
It is virtually impossible for the average player to block out the vision of the lake on this hole. Most players, who fear going left, aim right and further compound their swing path from the outside/in. Take dead aim down the middle and bite off only as much of this lake as you can. Short hitters can easily stay short of all bunkering and then take advantage of a good pitch and putt. Longer hitters may consider the gamble of a longer tee shot enabling a short iron in for control. Either way, your tee shot is absolutely the key at 17. Take par plus your handicap and happily get ready for one of the best finishing holes in Florida, the Bobcat's 18th.
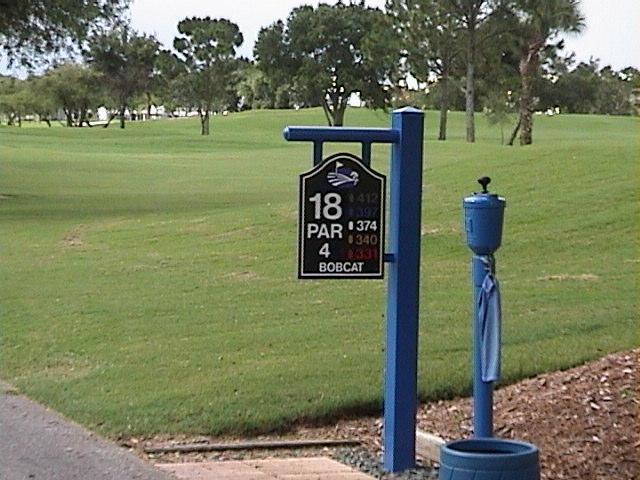
Hole 18
| Tee | Par | Yardage | Handicap |
|---|---|---|---|
|
Black
|
4 | 412 | 2 |
|
Gold - Ladies
|
4 | 340 | 2 |
|
Red
|
4 | 331 | 2 |
| Tee | Par | Yardage | Rating |
|---|---|---|---|
|
Blue
|
4 | 397 | 2 |
|
White
|
4 | 374 | 2 |
| Tee | Par | Yardage | Rating |
|---|---|---|---|
|
Gold - Men
|
4 | 340 | 2 |
Hole Description
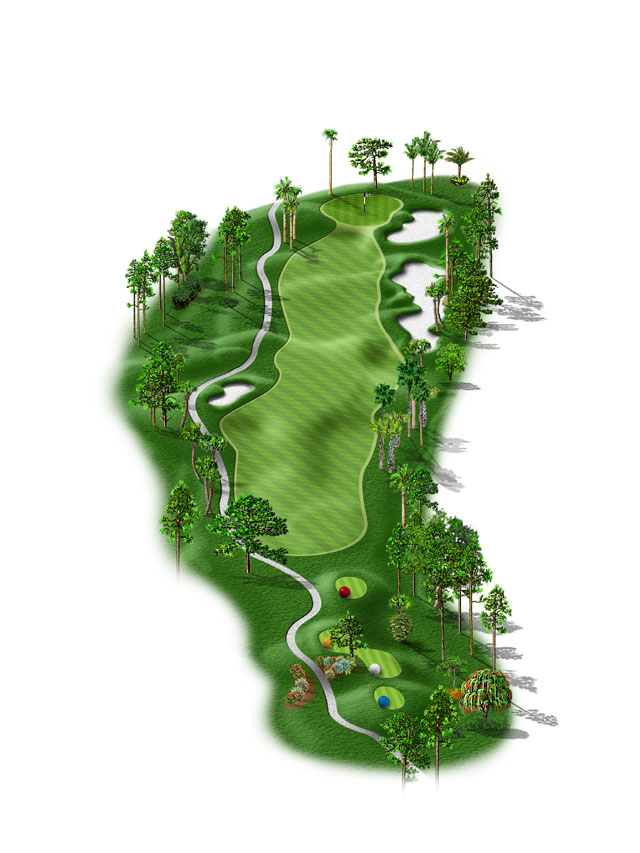
Simply one of the finest finishing holes of any golf course anywhere. That, an opinion shared by not only local golfers and members, but by LPGA qualifiers who play around the world. Typical of the Ron Garl use of rolling fairways, the 18th only reveals its grandeur in doses. From the tee players view the expansive and rising fairway with a great look across the 10th hole. As you approach the main landing area the greens complex, bunkering, classic white stone retaining wall and the main clubhouse area all strike a perfect vista for all eyes.
How To Play
There are probably as many ways to play this great golf hole as there are varying handicaps and golfing characters. Shorter hitters must be most careful in their possible blind second shots into the narrow approach area. This approach is pinched narrowly by water on the right. Most errors occur with that lurking lake. Long hitters can let the shaft out from the back tees. There is forgiveness at the top of the hill but again, do not be lured by any pin placement on the right half of this green. Everything falls toward the wall and the lake, including the putting surface. Birdies have been made at this hole, but good players general plan on par. Good Advise.
Panther Course Tour
Hole 1
| Tee | Par | Yardage | Handicap |
|---|---|---|---|
|
Blue
|
4 | 394 | 9 |
|
Gold - Ladies
|
4 | 350 | 3 |
| Tee | Par | Yardage | Rating |
|---|---|---|---|
|
White
|
4 | 374 | 9 |
| Tee | Par | Yardage | Rating |
|---|---|---|---|
|
Gold - Men
|
4 | 350 | 9 |
| Tee | Par | Yardage | Rating |
|---|---|---|---|
|
Red
|
4 | 319 | 3 |
Hole Description
The opening hole of the Panther course, as well as the finishing 18th, parallel this community's main street, Rockley Boulevard. Fittingly, both holes offer a very dynamic look to those who are passing by and our players. Much of Ron Garl's designs at Plantation include views from the tee to the landing areas only. #1 starts players with that selective vista. A long and meandering bunker begins at 150 yards out and progresses to the right side of a three-tiered green. A solid opening par 4 hole.
How To Play
Most of the Panther requires players to be more target aware with their tee shots. Here, there is more forgiveness than most Panther holes. Go for distance with your first shot and avoid the miss right into the bunker on your second shot; your only real hazard. With usually very quick Panther putting speeds, playing your ball to the correct portion of the green either with your approach shot or any chip is critical to scoring success. This green is difficult to putt from the left or right. The smart play is directly in front or even in back of the hole location.
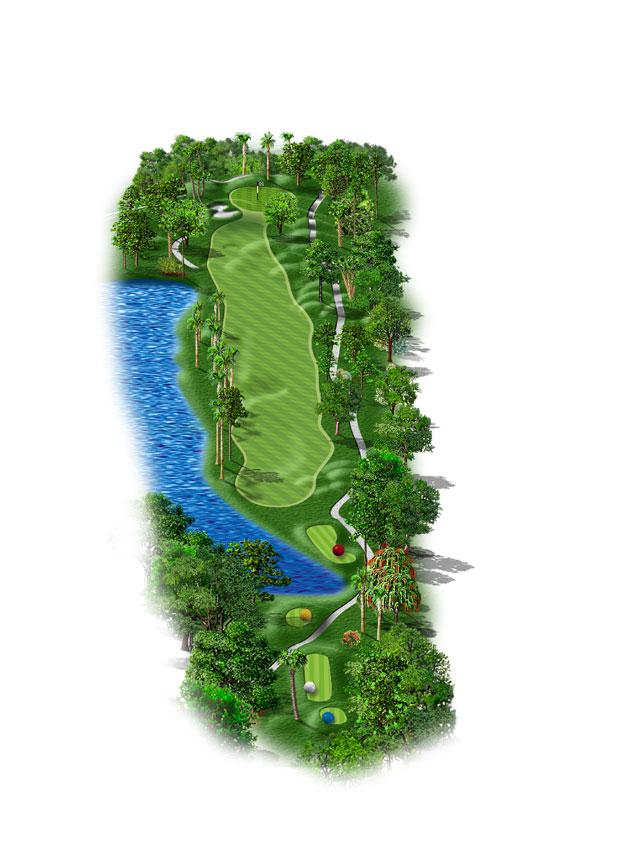
Hole 2
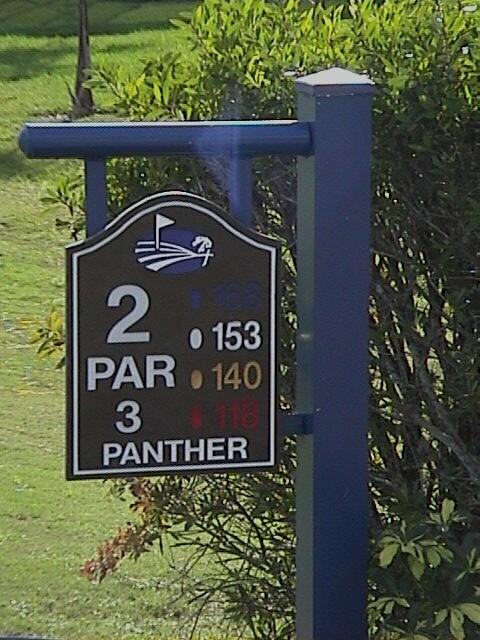
| Tee | Par | Yardage | Handicap |
|---|---|---|---|
|
Blue
|
3 | 168 | 15 |
|
Gold - Ladies
|
3 | 140 | 17 |
| Tee | Par | Yardage | Rating |
|---|---|---|---|
|
White
|
3 | 153 | 15 |
| Tee | Par | Yardage | Rating |
|---|---|---|---|
|
Gold - Men
|
3 | 140 | 15 |
| Tee | Par | Yardage | Rating |
|---|---|---|---|
|
Red
|
3 | 118 | 17 |
Hole Description
This is one of the most distinct little par 3 holes at Plantation. An architecturally perfect layout presents a fairly large green with subtle breaks that trick your eye, especially toward the back left of the green. A large and looming bunker protects nearly two-thirds of this target in the front. A stand of palms flanks the right side and often collects the drifting, faded shot. A thick and wooded backdrop makes this a very nice visual golf hole.
How To Play
Nine times out of ten the player who approaches this hole from the front right will score well. Even planning to miss your tee shot short and a little right will end up offering an easy chip and good putting position. Pin placements anywhere in the back left location require the better good player to fire at the middle of the green only, and higher handicappers should still play to the front right. The 2nd does receive and hold the higher shots, and those capable may want to take that gamble. #2 has yielded more aces since its renovation than any of the other seven Plantation par 3s.
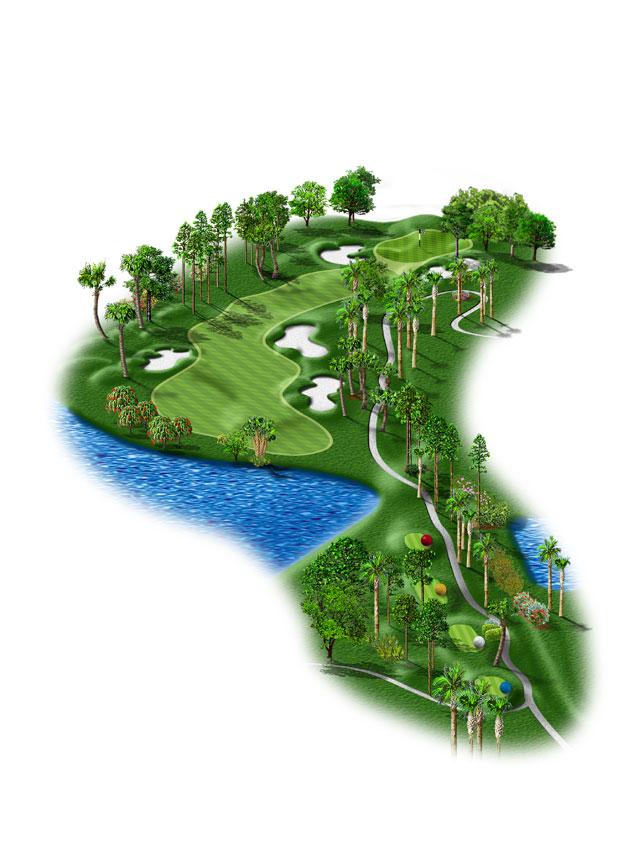
Hole 3
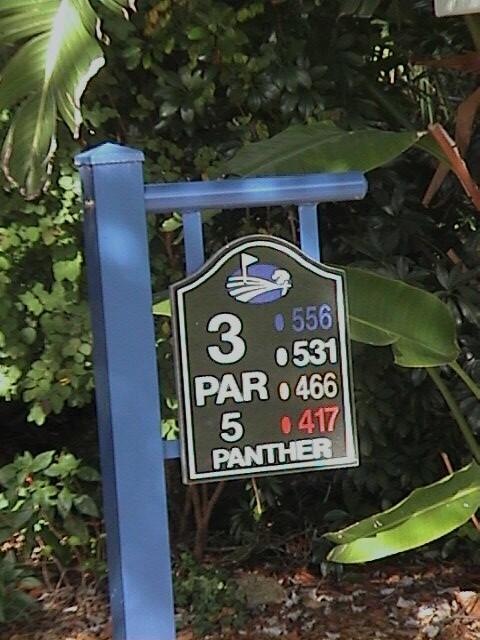
| Tee | Par | Yardage | Handicap |
|---|---|---|---|
|
Blue
|
5 | 556 | 3 |
|
Gold - Ladies
|
5 | 466 | 11 |
| Tee | Par | Yardage | Rating |
|---|---|---|---|
|
White
|
5 | 531 | 3 |
| Tee | Par | Yardage | Rating |
|---|---|---|---|
|
Gold - Men
|
5 | 466 | 3 |
| Tee | Par | Yardage | Rating |
|---|---|---|---|
|
Red
|
5 | 417 | 11 |
Hole Description
#3 is our longest of all par 5s at Plantation. It appears even longer than its 556 yards from the back tees because it is absolutely dead straight away. With its tees backed up near Rockley Blvd., and the green positioned against the trees at the back corner of the golf course, this hole tells players that their tee shot better be a good one.
How To Play
Our Plantation ladies get a serious break with their teeing ground ahead of the lake at #3. It is still a long hole for them; but for the male players, this is arguably the most challenging of all tee shots. Out of Bounds is very tight all along the right side from tee to green and a water hazard protects the left nearly as far. This is a three shot or more hole to the green, so it is advisable to select a club at the tee you can best control the direction. The closer you get to the green, the more you can afford to let out the shaft. The soil in front of #3 is usually soft and difficult to bounce a shot onto the putting surface. Success here depends mostly on keeping the tee shot in play and firing your approach shot to the middle or back of the green.
Hole 4
| Tee | Par | Yardage | Handicap |
|---|---|---|---|
|
Blue
|
4 | 352 | 17 |
|
Gold - Ladies
|
4 | 290 | 15 |
| Tee | Par | Yardage | Rating |
|---|---|---|---|
|
White
|
4 | 326 | 17 |
| Tee | Par | Yardage | Rating |
|---|---|---|---|
|
Gold - Men
|
4 | 290 | 17 |
| Tee | Par | Yardage | Rating |
|---|---|---|---|
|
Red
|
4 | 258 | 15 |
Hole Description
Once a simple hole stuck into an awkward turn on the course, the renovation of 1999 and the redesign of the fairway bunkers in 2002 created an attractive and enjoyable hole to play. While not a very long par 4, the double fairway bunkers and multiple palms and large oak trees create a neat dogleg affect. From the landing area a player's view includes looking over the largest fairway bunker, around the large oak, to an almost flat green flanked on either side by two large, rolling bunkers.
How To Play
There is no question that shortcutting this dogleg may allow you to use a much shorter club for your approach shot. However, the flat opening to this new green lends itself to rolling almost any kind of shot in from the center of the fairway. While a longer shot is required from the center, the odds are in your favor for a better score. There are just too many obstacles, including OB to the right. Play to the middle from the tee and take dead aim at the front center of this green's complex.
Hole 5
| Tee | Par | Yardage | Handicap |
|---|---|---|---|
|
Blue
|
4 | 377 | 1 |
|
Gold - Ladies
|
4 | 319 | 1 |
| Tee | Par | Yardage | Rating |
|---|---|---|---|
|
White
|
4 | 353 | 1 |
| Tee | Par | Yardage | Rating |
|---|---|---|---|
|
Gold - Men
|
4 | 319 | 1 |
| Tee | Par | Yardage | Rating |
|---|---|---|---|
|
Red
|
4 | 311 | 1 |
Hole Description
Standing on the tee at the par 4, 5th hole, an unfamiliar guest might have no idea in which direction this hole doglegs. A small canal traverses the left side and ultimately disects the fairway at the 90 degree dogleg left. It is less than a driver to the landing area, and once players arrive at their second shot, the greens complex comes into full view. A high, backside green's bunker and a huge horseshoe bunker front, right splash this heavily sloped green with color.
How To Play
Avoid the ditch at all costs. A huge percentage of high scores on this hole are a result of a tee shot that ran left into the ditch. Play safe and lose it left if you must, but a longer second shot is much better than a penalty stroke and no distance. Expect this to be one of the toughest greens to putt. Two putts is a success. Play the tee shot safe right (1), then play an approach short to avoid bunkers (2), chip it on somewhere below the hole (3), another safe lag putt to within a foot or two (4), sink the next for a happy bogey. Anything else is icing on the cake.
Hole 6
| Tee | Par | Yardage | Handicap |
|---|---|---|---|
|
Blue
|
4 | 351 | 13 |
|
Gold - Ladies
|
4 | 297 | 7 |
| Tee | Par | Yardage | Rating |
|---|---|---|---|
|
White
|
4 | 337 | 13 |
| Tee | Par | Yardage | Rating |
|---|---|---|---|
|
Gold - Men
|
4 | 297 | 13 |
| Tee | Par | Yardage | Rating |
|---|---|---|---|
|
Red
|
4 | 274 | 7 |
Hole Description
Again, Ron Garl hides the view of the green from the tee with a rolling upward landing zone. This medium range par 4 can offer up a good score and fresh life for any player after rounding the corner at #5. A small fairway bunker adjoins the left side near the top of the hill. From the hill you have a perfect look into the face of a green that slopes sharply from back to front and a bunker on either side. A nice looking hole with beautiful homes as our backdrop.
How To Play
Think about a good score for your card here. It is not a given, but most players can find the fairway and at least the upslope. That position makes it easier to loft the next shot, and with a most receptive green, one can play right into the heart of the hole. Longer second shots can roll onto the bottom half of the green, and those long drivers will have a short shot that can be fired at the flagstick. The 6th is practically a two-tiered green that also requires you to land below the hole for a front pin, yet anywhere on the top slope is ok for a back pin. Except for the big slope, you need not read too much into the rest of this green. Pick a line and roll it in with authority.
Hole 7
| Tee | Par | Yardage | Handicap |
|---|---|---|---|
|
Blue
|
3 | 187 | 11 |
|
Gold - Ladies
|
3 | 142 | 13 |
| Tee | Par | Yardage | Rating |
|---|---|---|---|
|
White
|
3 | 170 | 11 |
| Tee | Par | Yardage | Rating |
|---|---|---|---|
|
Gold - Men
|
3 | 142 | 11 |
| Tee | Par | Yardage | Rating |
|---|---|---|---|
|
Red
|
3 | 133 | 13 |
Hole Description
This is a lovely par 3 nestled within the pines of an equally lovely neighborhood of homes. Elevated tees and an equally elevated green with no sand bunkers creates a different and clean appearance to this hole.
How To Play
The putting surface of #7 is tame by the standards of most Panther greens. Relatively flat, it may tease some players to over read the breaks. The hardest chore on this hole is getting the tee shot up onto the green and holding it there. The steep approach makes it difficult to bounce a tee shot on. Most often the ball will collect down towards the cart path. Using the slope around the green to play your chip shot is great advice. A bad chip here means some practice time is needed on your short game.
Hole 8
| Tee | Par | Yardage | Handicap |
|---|---|---|---|
|
Blue
|
4 | 370 | 5 |
|
Gold - Ladies
|
4 | 306 | 9 |
| Tee | Par | Yardage | Rating |
|---|---|---|---|
|
White
|
4 | 342 | 5 |
| Tee | Par | Yardage | Rating |
|---|---|---|---|
|
Gold - Men
|
4 | 306 | 5 |
| Tee | Par | Yardage | Rating |
|---|---|---|---|
|
Red
|
4 | 262 | 9 |
Hole Description
The next two holes, beginning with the 8th, are indicative of the narrowness Ron Garl designed into the shorter Panther course. Target golf becomes more apparent as one reaches this teeing ground. #8 is a par 4 that slides from right to left gradually around a pretty pond and grove of tall pines. A dramatic greenside bunker that is nearly as large as the green itself dominates the front right.
How To Play
Trying not to overstate the obvious, but going left into the lake is bad. There is enough room through the far side of this dogleg to avoid that penalty possibility. There is really only one place any player should play onto this green, and that is the left side. Even if the flagstick is far right, play to the left side. If you can two-putt, you can score from the left side. Your options for a mistake to the right-half of the green include the big bunker, a hazard just to the right of the cart path, or over the green into some gnarly rough and low canopied trees. Remember, right side from the tee; left side onto the green.
Hole 9
| Tee | Par | Yardage | Handicap |
|---|---|---|---|
|
Blue
|
5 | 476 | 7 |
|
Gold - Ladies
|
5 | 414 | 5 |
| Tee | Par | Yardage | Rating |
|---|---|---|---|
|
White
|
5 | 460 | 7 |
| Tee | Par | Yardage | Rating |
|---|---|---|---|
|
Gold - Men
|
5 | 414 | 7 |
| Tee | Par | Yardage | Rating |
|---|---|---|---|
|
Red
|
5 | 386 | 5 |
Hole Description
#9 is simply one of the best, prettiest and most fun par 5s we play here at Plantation. While there is plenty of trouble along the way with Out of Bounds all down the left side and a very large water hazard all down the right, the maximum yardage from the back tees is still only 476 yards. A grove of trees buffers the lake for 2/3 of the drive zone and one of our larger and more shapely bunkers dominates the ground between the lake and the green.
How To Play
The best advice given for playing this hole has not changed since opening day at the Panther nearly 14 years ago. Take only what this hole will give you and no more. That is, if it is a three shot hole for you to the green, hit a shorter more controllable club from the tee and again for your second shot. Even with two short shots to begin the hole, most players will have a relatively short third shot, then to the green. Ask yourself this question before playing from the tee...Would you take a 5 on this hole right now? If yes, play conservative and take the potential big number out of the scenario.
Hole 10
| Tee | Par | Yardage | Handicap |
|---|---|---|---|
|
Blue
|
4 | 381 | 8 |
|
Gold - Ladies
|
4 | 322 | 12 |
| Tee | Par | Yardage | Rating |
|---|---|---|---|
|
White
|
4 | 358 | 8 |
| Tee | Par | Yardage | Rating |
|---|---|---|---|
|
Gold - Men
|
4 | 322 | 8 |
| Tee | Par | Yardage | Rating |
|---|---|---|---|
|
Red
|
4 | 295 | 12 |
Hole Description
The tenth hole of the Panther is a straightaway par four. That is the most simply stated description of what is a very pretty hole which is far more challenging than it appears from the tee. It is our next to longest par four on the back nine. It is also visually intimidating the closer you approach the green with its large and shapely bunkers. Four bunkers, beautifully designed and perfectly maintained, make this hole worth playing.
How To Play
The tenth is protected by Out of Bounds to the left for all tee shots. A large lake further to the right of the fairway also claims many golf balls. This hole should be played conservatively from the tee to avoid either of the above. Players second shots should also be planned to maximize a center of the fairway approach which may then provide an easier pitch and putt. Players who can play to the green with their second shot can fire at the front, middle of the putting surface. If the shot is too hot, it does have a little room to get off the back of the green without going in a bunker and leaving a fairly easy bump and run chip to recover.
Hole 11
| Tee | Par | Yardage | Handicap |
|---|---|---|---|
|
Blue
|
3 | 197 | 12 |
|
Gold - Ladies
|
3 | 164 | 18 |
| Tee | Par | Yardage | Rating |
|---|---|---|---|
|
White
|
3 | 188 | 12 |
| Tee | Par | Yardage | Rating |
|---|---|---|---|
|
Gold - Men
|
3 | 164 | 12 |
| Tee | Par | Yardage | Rating |
|---|---|---|---|
|
Red
|
3 | 149 | 18 |
Hole Description
The par 3s around the Panther are all beautiful to look at, and #11 is very nice. A backdrop bunker slithers above and behind this green. It collects very few shots but really defines the putting green so well. A very large bunker protects the right half of one of our most undulating surfaces.
How To Play
Green speed defines degree of difficulty here. When speeds are up, a downhill putt may be followed by chip shot back onto the green. This hole is all about keeping your golf ball in the correct position relative to the pin. It may be a better bargain to miss the green short than to hit the green and be above the hole. #11 breaks three ways but is lightning from off the top slope to the front of the green. This would be another good hole to sneak up on.
Hole 12
| Tee | Par | Yardage | Handicap |
|---|---|---|---|
|
Blue
|
4 | 335 | 6 |
|
Gold - Ladies
|
4 | 238 | 10 |
| Tee | Par | Yardage | Rating |
|---|---|---|---|
|
White
|
4 | 308 | 6 |
| Tee | Par | Yardage | Rating |
|---|---|---|---|
|
Gold - Men
|
4 | 238 | 6 |
| Tee | Par | Yardage | Rating |
|---|---|---|---|
|
Red
|
4 | 229 | 10 |
Hole Description
Of greatest notoriety at Plantation are the four holes on the back side of the Panther that members have labeled the "Panther's Claw". The 12th hole kicks off the Claw by showcasing a short and 90 degree dogleg right over two sections of an environmentally protected area. A Pine Valley type view of the green is not revealed until you get directly across from it at the turn of the dogleg. Wilderness bridges take you through a long run of natural Florida vegetation that connects this green to the 13th tees, step two of The Claw!
How To Play
Most players simply get overwhelmed with all of the potential hazards beckoning their tee shot here. Most players see this par 4 tee shot as a lay up shot and then underclub their way short of the turn to the green. Try taking more club than you would think and go ahead and hit it. The fairway does widen the further you go and you still have an open shot with a short club to the green. It is only a 58 yard carry across the junk in front of the green. Select a club that you know you can get some air time and you will safely carry that hazard.
Hole 13
| Tee | Par | Yardage | Handicap |
|---|---|---|---|
|
Blue
|
5 | 483 | 14 |
|
Gold - Ladies
|
5 | 405 | 6 |
| Tee | Par | Yardage | Rating |
|---|---|---|---|
|
White
|
5 | 443 | 14 |
| Tee | Par | Yardage | Rating |
|---|---|---|---|
|
Gold - Men
|
5 | 405 | 14 |
| Tee | Par | Yardage | Rating |
|---|---|---|---|
|
Red
|
5 | 367 | 6 |
Hole Description
The second hole of the Panther's Claw is a wonderful par 5. #13 & #14 both are cut out of the far northeast corner of Plantation's property. At the 13th it's just you, the ball and some of the best Mother Nature can offer a golf hole. A player's first look at this hole comes as you drive off the long bridge out of the wetlands and woods. The green fairway cuts through the natural look and concludes at a most picturesque island green, shaped by a new, wood retaining wall. This corner of our golf world is a most serene spot.
How To Play
Much like the par 5, 9th hole, Players should take what this jewel of a hole offers. Again, for most, this is a three shot hole. The second lay up shot is the most critical here. Higher handicappers often make the mistake of wasting a chip shot to get as close to the lake as possible and then over-club their water shot to the green. There is less than 60 yards of carry to clear the water. Take a more lofted club and trust it. Barely carrying the water, but staying dry, also puts a player in the correct position below the hole. Longer hitters can afford to gamble with a fairway wood to the green and still make par if that shot is lost in the hazard because a wedge is only needed from the drop area.
Hole 14
| Tee | Par | Yardage | Handicap |
|---|---|---|---|
|
Blue
|
4 | 368 | 2 |
|
Gold - Ladies
|
4 | 332 | 2 |
| Tee | Par | Yardage | Rating |
|---|---|---|---|
|
White
|
4 | 356 | 2 |
| Tee | Par | Yardage | Rating |
|---|---|---|---|
|
Gold - Men
|
4 | 332 | 2 |
| Tee | Par | Yardage | Rating |
|---|---|---|---|
|
Red
|
4 | 296 | 2 |
Hole Description
There are only two things happening on this innocent par 4, 14th hole: the fairway grasses and lots of trees. There are no water hazards on this hole. There are no fairway bunkers. In fact, there is only one bunker, and it is fairly short and right, well away from the green. What makes this hole a worthy partner in the string of four "Claw" holes is the narrowness of its fairway that also slopes toward the cart path on the left. 14 also owns our smallest putting green. Nestled neatly among so many tall pines and free of any residential housing, the 14th is an equal to the 13th in it's quiet and beautiful surroundings.
How To Play
Stating the obvious here is to mention that players need to be directionally accurate with all shots at the 14th. Most players slice the tee shots and that almost guarantees one penalty shot. Over compensate and a pulled shot then catches the subtle slope of the fairway toward the cart path and another possible penalty. While this green is small, it is not difficult to read and putt. It is also one of the few greens that playing from the back half or even chipping from behind the green is not so bad. Local knowledge will tell you that the approach area up to this green is usually soft and will not release an incoming shot. Therefore, we recommend most players to either stay short of the approach and then pitch the third shot all the way to the hole, or go all out with the second shot and play beyond the hole.
Hole 15
| Tee | Par | Yardage | Handicap |
|---|---|---|---|
|
Blue
|
3 | 153 | 18 |
|
Gold - Ladies
|
3 | 110 | 16 |
| Tee | Par | Yardage | Rating |
|---|---|---|---|
|
White
|
3 | 141 | 18 |
| Tee | Par | Yardage | Rating |
|---|---|---|---|
|
Gold - Men
|
3 | 110 | 18 |
| Tee | Par | Yardage | Rating |
|---|---|---|---|
|
Red
|
3 | 105 | 16 |
Hole Description
The Panther's 15th hole is her signature hole and the final leg of the four hole string called the "Panther's Claw" by locals and members. This par 3 is a full island green completely bordered by a sand bunker and wood retaining wall. 15 backs up to Rockley Blvd and presents a great look to all who pass by. From any one of the six teeing areas, players have all the visual stimuli they can handle.
How To Play
Good players, who are able to fight off the presence of so much water and sand in their view, welcome one of the largest putting surfaces at this par 3 hole. There is not a lot of undulation on this green either. Par is an average score for the better than average player. However, for most of the rest of us it's just hard to put all that sand and water out of mind. Keep this in mind: the sand is better than the water in terms of scoring. There is a lot of land within the boundary of that wall. Take a little more club and tee it up a little higher for a higher trajectory and finish your swing. Good luck and you'll clear the challenge of the Claw.
Hole 16
| Tee | Par | Yardage | Handicap |
|---|---|---|---|
|
Blue
|
5 | 502 | 10 |
|
Gold - Ladies
|
5 | 460 | 4 |
| Tee | Par | Yardage | Rating |
|---|---|---|---|
|
White
|
5 | 492 | 10 |
| Tee | Par | Yardage | Rating |
|---|---|---|---|
|
Gold - Men
|
5 | 460 | 10 |
| Tee | Par | Yardage | Rating |
|---|---|---|---|
|
Red
|
5 | 424 | 4 |
Hole Description
You have survived the Claw and now find yourself on the wonderful and testy par 16th. This hole gradually doglegs to the right as it makes its way up through the homes of Governor's Green. At the corner of the dogleg is a medium-size lake with a beautiful wood retaining wall rolling in and out along the golf course's right side. Our 16th green sits under the shadows of a number of palm trees and a sharp, undulating bunker to its front right.
How To Play
There is plenty of room to unload your biggest tee shot here. But, there is considerably less room to finesse your second shot into the fairway grasses. Most scoring mistakes on this hole are a result of players demanding too much distance for that second shot. Relax and deliver two steady swings for the first two shots, and then bear down on the position of your approach shot to the green. Regardless of where the pin is located, please play to the middle of this putting surface. We still haven't figured out the many directions this teasing green breaks. Two putts is a victory.
Hole 17
| Tee | Par | Yardage | Handicap |
|---|---|---|---|
|
Blue
|
4 | 368 | 16 |
|
Gold - Ladies
|
4 | 280 | 14 |
| Tee | Par | Yardage | Rating |
|---|---|---|---|
|
White
|
4 | 352 | 16 |
| Tee | Par | Yardage | Rating |
|---|---|---|---|
|
Gold - Men
|
4 | 280 | 16 |
| Tee | Par | Yardage | Rating |
|---|---|---|---|
|
Red
|
4 | 271 | 14 |
Hole Description
The renovation of 1999 moved the 17th's green back about 35 yards. In the process, a whole new perspective of this hole was achieved. Formerly a routine and shortish par 4, now presents a devious greens complex that got several clubs more difficult. In 2005, a wood retaining wall cleaned up the look lake in front of the teeing area. Rolling mounds along the left hand side add to the deception of depth during the entire ride to this hole. This hole will keep you thinking.
How To Play
Remember our advice for playing #8? Right, then left? The opposite is true here at #17. Play left off the tee and then right to the green. Avoid the bunker and OB right at all costs. Then avoid the greenside bunker and the back-left portion of this green with your approach. The top shelf of the putting surface feeds most shots off the back and down the hill. There you will be in jail. So, do your left, then right, and if you missed the green appropriately short and right, you are left with a classic bump and run shot to the hole.
Hole 18
| Tee | Par | Yardage | Handicap |
|---|---|---|---|
|
Blue
|
4 | 409 | 4 |
|
Gold - Ladies
|
4 | 367 | 8 |
| Tee | Par | Yardage | Rating |
|---|---|---|---|
|
White
|
4 | 383 | 4 |
| Tee | Par | Yardage | Rating |
|---|---|---|---|
|
Gold - Men
|
4 | 367 | 4 |
| Tee | Par | Yardage | Rating |
|---|---|---|---|
|
Red
|
4 | 311 | 8 |
Hole Description
Plantation has two of the most challenging finishing holes of any 36 hole facility. The Panther's final hole concludes the golfer's experience as it began at #1; following the curves of Rockley Blvd. while presenting our second largest bunker with a wood bulk-head border and a long lateral water hazard. Plantation's tennis facility comes into view to the right along with our new and magnificent clubhouse. Down the left side one rides the Panther's largest hill that parallels the fairway. The greens complex is flanked by large Queen palms and most beautiful flowing flowerbed. After all the golf, this hole inspires all to return.
How To Play
The 18th calls for a power play all the way. For every level of play, the tee shot requires your biggest bang. Pace yourself then to the next shot and then once again throttle up. The narrowest portion of the second landing area is still 90 yards out. Why risk that tight spot when you can jump past that to a wider approach. The new, still very large, fairway bunker provides a less scary angle to the green and room to "get a sand shot airborne". So the risk of entering the bunker is not so intimidating. If you still have some work to do after going all out on your first two shots, don't stop; fire your approach shot to the middle of the green, and you can make that putt to any hole location.
